
Programs & Training Schedule
To view a list of current programs being offered, please log in to Cornerstone.
Log in to Cornerstone
If you don’t have a Cornerstone account and would like to participate in a professional development activity, please contact Jackie Nolasco at jnolasco@elcamino.edu or Professional Development at prodev@elcamino.edu.
- Can I print a list of all the programs and training opportunities for the current
semester?
Yes, log in to Cornerstone to view and print a list of programs and training opportunities for the current semester. - May I register online for classes and training programs?
Yes, to register online visit http://www.elcamino.edu/myecc/ and log in to Cornerstone.
Software Walkthrough
When you're emailing fellow ECC employees and/or students, sending them a link to a file can be a great alternative to attaching it
Why?
- You can send any sized document you want without running into email attachment limitations
- It protects confidential information
A great solution is Sending a Link to your file(s) instead:
**OneDrive gives you a bunch of different options for sharing files. Some are better
for different levels privacy you might need + how many people you need to share the
file with.
This demo will show you one of the most common ways of sharing. At the end of this
doc, I'll briefly go over some of the differences between the options so you can pick
which style works best for you
In this example, I'll share a file called “Sample Report” with my co-workers Tuan & Jackie. (This example is for a non-confidential file. Later I’ll show you how to send a confidential one.)
- Upload the file to your OneDrive account
On the entry for the file, find the Sharing column (right side of screen.) - Click the word (Your uploaded files start off private by default)

- This brings up the sharing window. Double-check that the file name in the upper left of this window matches the name of the document you want to share with people. (It’s possible to disable the sharing link if you made a mistake and shared the wrong file-- but it’s better to not have to do that.)
- Click Share
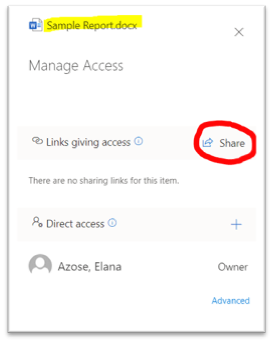
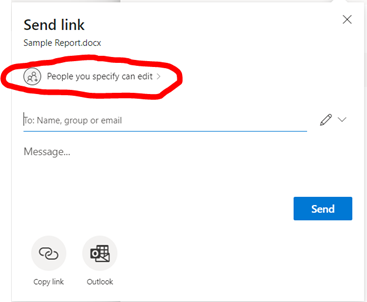
- A window will pop up where the default setting is to give your recipients Editing privileges. But you can change this.
In this example, I just want to share my document with Tuan and Jackie. I want them to read it, but I don’t want them to be able to edit the original. (Basically, the same as if I were attaching the file to an email.) So in the next steps, I’m going to change that permission settings.
- In that sharing pop-up, click on the sentence “People you specify can edit.”
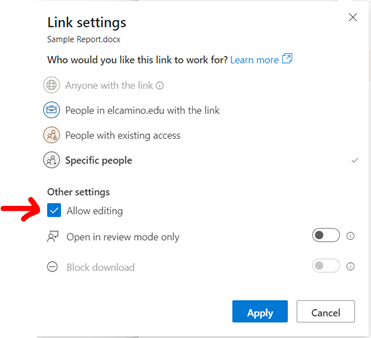
- First, uncheck the box next to “Allow editing”
- Here’s what it’ll look like once you’ve unchecked the box. It now gives you the option
to block the file from being downloaded, if you’d like.
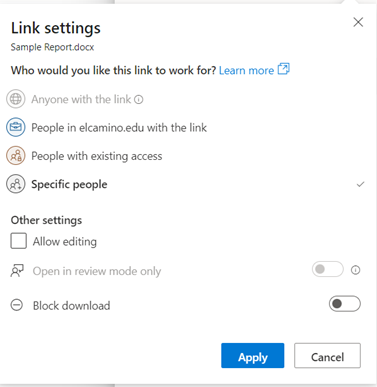
This way, Jackie & Tuan can't edit my original file. They could technically download a copy and start editing it, but they'd only be editing that new version on their own computer. The original wouldn't change.
**If I wanted them to be able to edit the original, like if it's for a project we're all working on together, then I would just leave that box checked. That would make the file like a Google doc.
- Now I have to choose how I want to share this file with them. Since this isn’t a confidential document, I’ll go with the easiest option – I’ll click on “People at @elcamino.edu with the link.” (At the bottom, I’ll go over why I chose this one, and what each choice means.)
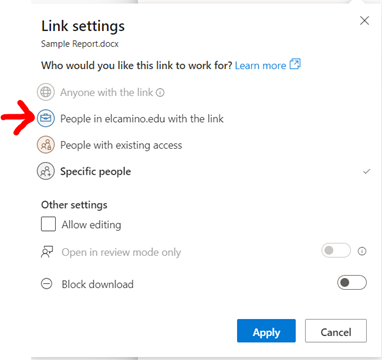
- Click Apply
A new pop-up will appear. Notice how it now says people with the link can view the document (rather than edit it.)
I have a few choices on this screen. I can either type in Tuan & Jackie’s names on
the To: line, or I can get a link that I can send to them.
For this example, I’ll click Copy link (lower left)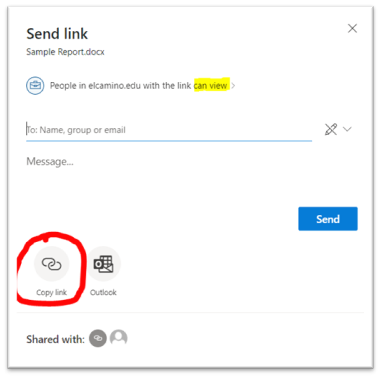
- In the pop-up that appears, click Copy
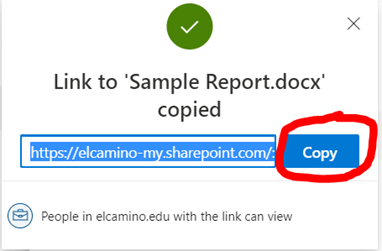
Now I have a link copied to my clipboard that I can send to Tuan and Jackie
Q: “Why didn't you choose the option to type in their names? Wouldn't that have been
faster?”
A: Yup, that can be faster if it's shared with only a few people. But sometimes you
know you'll need to share the file with more folks later on. (Ex: A doc about the Tenure Reception room set-up that we’re later going to send to the
Faculty Development Committee.) It'd take a long time to type in all the names of
everybody on the committee one by one, so it's often easier to just get a link that
I can pop into a group email.
Letting Recipients Edit
Being able to collaborate on a file is one of the really neat features of Office 365 :) It's like having a Google doc, but with a whole lot more tools.
When you share a file for collaboration, there are a few tips I’d recommend:
- Make a copy of the original document, that doesn't get shared. (Ex: “Sample Report - orig.docx”)
- Turn on the setting “Open in review mode only”
That way, everybody can see what changes were made to the original, and by whom. People can also easily leave comments & ask questions.
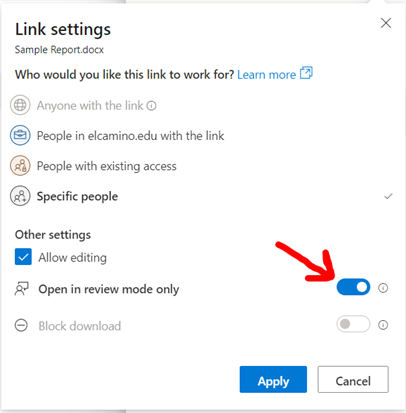
- Choose the setting for “Specific people,” and then type in the names of the people who you’ll allow to edit the file. (See pictures below)
Yes, it’ll take more time to type in everybody's name individually (rather than the ‘creating a link’ method.) But it gives you control over who can make changes to the file. (Because otherwise, anybody who had the link could make changes.)
Ex: You share a link to your syllabus with a colleague for review, and he accidentally forwards your email to one of his classes. Since his students now have the sharing link, any of them can make whatever changes they want to your document. (ß This scenario can be avoided by using the ‘Specific People’ method.)
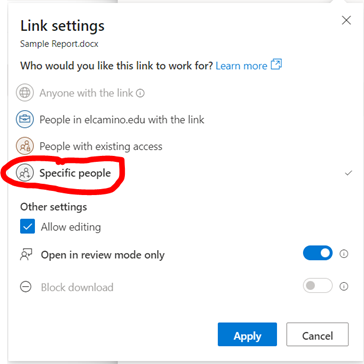
- First, on the Link Settings pop up, select “Specific People”
- Click Apply
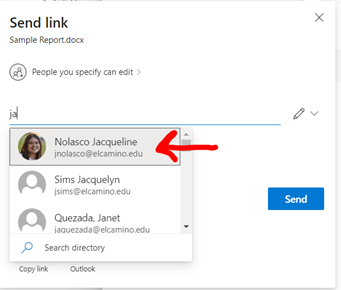
- A new popup will appear where you can type in their name(s). (Their name will usually appear after typing only a few letters, and you can just click on it.)
- Click Send. You’ll see another pop up letting you know that they've been sent a link*
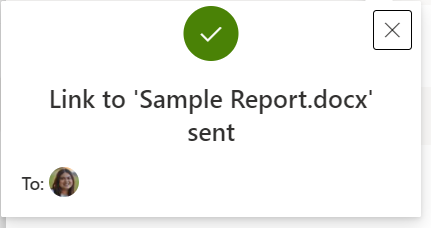
* Yes it's a link -- but it's a special kind that only works when those specific people you’ve named log in to their Office 365 account.
Ex: Let's say that Jackie and I are both Faculty members, and Jackie accidentally forwards that link to her class. Not a problem! Since I used the ‘Specific People’ method, that link will only work for Jackie.
Q: What if I want someone to edit my file and some people to only be able to read it?
A: That's totally fine – you can share the same document in multiple ways J Just click that Share button again, and go through all the steps for each type of group.
Ex: For this same document, I might share it so that our manager Dr. Martin can edit it in regular mode, Jackie can edit it but only in Review Mode, and Tuan can read it.
Confidential Files
Sharing a file through Office 365 can be more secure than emailing attachments. Emails with attachments can get accidentally forwarded. But if you share the file using the setting of “Specific people,” and the link gets accidentally forwarded, it won't work for someone that it wasn't intended for.
(See steps below.)
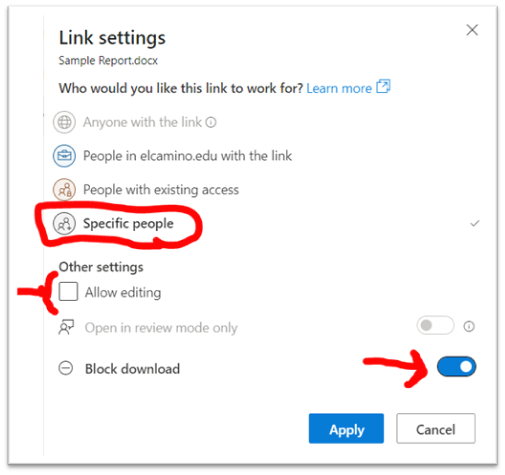
- First, select “Specific people”
If applicable, you might also consider unchecking the box that allows people to edit the file. Taking away the ability to edit will allow you to toggle On the setting to block downloading.**
**Note: The ‘Block download’ setting is more of a speed bump than a full barrier. A person could still take a screenshot, use their phone to take a picture of the screen, etc.
- Click Apply
- A new popup will appear where you can type in the name(s) of the recipient(s). (Their name will usually appear after typing only a few letters, and you can just click on it.)

- Click Send. You’ll see another pop up letting you know that they've been sent a link

Option one
- First, Save your file
If you’re working on a file in Microsoft Office, click on the Acrobat tab

- Select ‘Create PDF’

- Choose where you’d like your file to be saved. You can keep the same file name if
you’d like.
Click Save

Option two
If you’re not working on El Camino computer, the Acrobat tab may not appear in the ribbon. (That’s because it’s an add-on that the college purchased.) So this method uses the Print feature – which works even if you don’t have a printer
- First, Save your file
Press Ctrl + P
In the dropdown menu where you’d normally select the name of your printer, instead you’ll select “Adobe PDF”
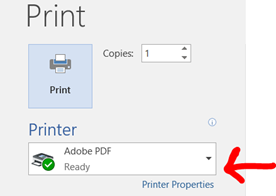
- Click the Print button
Choose where you’d like your file to be saved. You can keep the same file name if you’d like.
Click Save

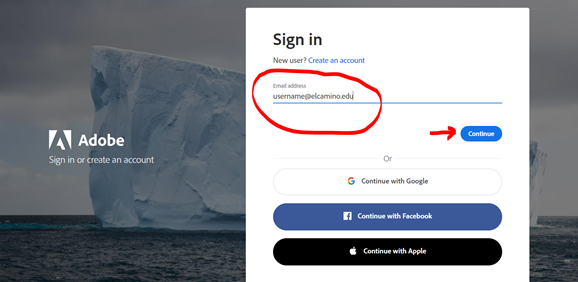
Our Adobe accounts use our MyECC logins – which is very handy! (So your username is your full @elcamino.edu email address, and your password is your MyECC password.)
**You should not have to enter any credit card information. Our Adobe accounts are
Free for all ECC employees, including part-time employees & student workers.
If you can’t sign in, or you get a message that your license expired, or it asks for
a credit card # / encourages you to start a free trial, please email the Help Desk
at helpdesk@elcamino.edu.
Logging in
Unlike Office365, which sometimes keeps you logged in for a few days at a time, Adobe will make you sign in each day.
- Head over to Adobe.com
- Click the Sign In link in the upper right corner
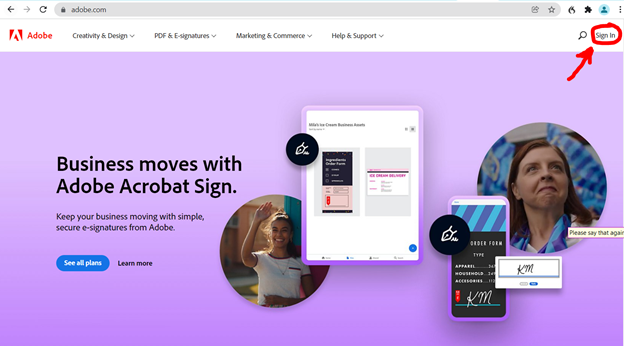
- Type in your full El Camino email address and click the blue “Continue” button
- The ECC Single Sign-On page will load:
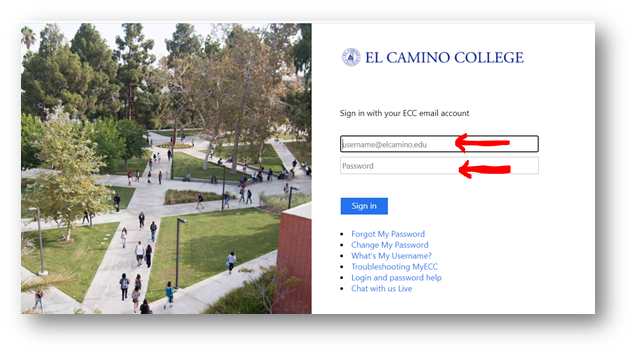
- Log in just like you’re logging in to the MyECC portal.
(Remember to type in your full El Camino email address, including the @elcamino.edu part.)
- You might be taken directly to your Adobe dashboard, and see your name on the right
hand side of the screen.
Or you might see a screen saying, “Welcome back.” Both screens are fine
Why is ____ missing?
There’s a known glitch where certain Adobe products look like they aren’t included in El Camino’s license anymore, even though we still have them. For example, I noticed that Acrobat DC was missing in my account:
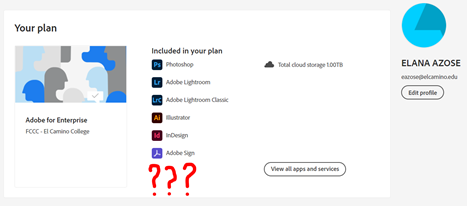
Apparently, this can happen if you downloaded one or more Adobe products back when El Camino was under its previous license. Here’s how to get all the products to appear:
- Make sure you’re connected to the VPN
- Sign out of your Adobe account
- Uninstall ALL of the Adobe products you’d previously downloaded
- Sign back into Adobe.com
- (Optional) Re-download any products you want installed on your computer.*
*$ You don’t need to install Adobe products in order to use them. (They work just fine in the cloud =)) But if you’d like to install them, you can
Please don’t do the ‘image shortcut’ (i.e., saving your pdf as a JPEG / taking a screenshot of it and then pasting that image into your email). This breaks all of your hyperlinks/makes the links un-clickable, and it also makes the PDF inaccessible
Insert it as an Object (instructions below)
- Put your cursor at the spot in the email where you’d like your PDF to go.
Click on the Insert tab

- Click on Object (it’s on the right-hand side of the ribbon)

-
*** If for some reason, it won’t let you click on the Object button (i.e, if all the choices are grayed out), your cursor is probably in the wrong spot. Make sure that your cursor is in the body of the email before you click the Insert tab.
Select the “Create from File” tab 
- Click Browse

- Click on the name of the file you would like to insert
Click Insert 
- The name of your file will now appear in the field next to the Browse button.

- The PDF should now appear inside the body of your email
Here’s what that Dual Enrollment flyer looks like once it’s been inserted as an object
inside my message: 
If it looks too small, you can resize it. (Optional)
- Click on the PDF to select it. A dotted outline will appear around it.
-

- Click & drag on one of the corner tiny black boxes to make the PDF bigger.

This guide goes over how to uninstall programs/apps that you’ve downloaded. If you aren’t seeing a program listed as you go through the steps:
- It might be listed under the publisher’s name (Ex: Adobe Photoshop instead of Photoshop.)
It may be a ‘web-version only’ program. For example, 25Live or Formstack.
-
Steps
- Click the Start Menu

- Click Settings

- Select Apps

- On the right-hand side, you’ll see the date that each program was installed.
In this example, I’m going to be uninstalling all of the Adobe products.

**Even though Windows 10 allows us to delete multiple items at once in places such as File Explorer, here in the Apps area it’s best to uninstall apps/programs one by one.
Note: Notice how in the pic above, there is a plain gray bar highlighting Adobe Acrobat DC? This shows that it’s only kind of selected. An app has to be Fully selected for the uninstall option to appear. (See Step 5 below.)
- Click on the first app that you’d like to uninstall. (You may need to double-click the name of the app to get the Modify and Uninstall buttons to appear.)

- Select ‘Uninstall’
A pop-up will appear where Windows double checks if you really want to uninstall the app. Click the Uninstall button in the pop-up.

Don't worry— even though you're uninstalling a program, it shouldn't delete the files you have saved on your computer.
Ex: If I'd made a bunch of Photoshop files, and then I uninstalled Photoshop, I would still have all the files themselves. I could save the files to a thumb drive, for example, and open them up on a different computer that has Photoshop installed. Or I could wait until I re-installed Photoshop on my computer.
- Sometimes, a different program that you currently have open will block the process. Here’s a notification that Outlook is preventing my computer from uninstalling Acrobat DC. Go ahead and close the program that’s blocking it, and then click Retry.

- Depending on the app/program that you’re uninstalling, it may ask you if you want to remove preferences. (This pop-up will only appear for certain software.)
- Another pop-up will appear letting you know that Windows is configuring the app
- When it’s done, there unfortunately isn’t always a message letting you know it’s complete. But you can check that the uninstall was successful by going back to the App page in Settings.
Issues
Uninstall/Repair
-
For certain apps/programs, it’ll double check that you’re really, really sure you want to uninstall it. This usually happens after Step 8. You’ll get a pop-up asking if you want to Uninstall or Repair.
In general, if you’re uninstalling a program because it’s acting wonky, you might want to try the Repair option first.
***However, there is a known issue with our Adobe products not working correctly if they were installed when El Camino was under its previous license. (This includes missing features and buttons, Adobe.com asking you for a credit card number, etc.)
So if you’re reading this guide for Adobe issues occurring in 2022, don’t bother clicking the Repair button; just click Uninstall.
Different order
Sometimes, the order in which you delete your apps/programs matters. For example, I tried to uninstall Adobe Creative Cloud while I still had Adobe Media Encoder and Premiere Pro on my computer. I got the following error message:

So I had to uninstall both Premiere Pro and Media Encoder before it would let me uninstall Adobe Creative Cloud.
Making you Log In
For certain Adobe programs, it’ll make you log in to your Adobe.com account before it will let you uninstall the program. For example, when I went to go uninstall Premiere Pro, I had to log in to my Adobe account first. Once I’d logged in, it updated Premiere Pro to the latest version of the software, and then it let me uninstall it.
It can be kind of neat to be logged into your Adobe account while the products are uninstalling, because you can watch the process in real time and then see the product disappear from the Installed list.

FAQ
Q: If I uninstall an Adobe product and it removes it from the Installed list in my account, does that mean the product is gone from my account?
A: No, you still have it in your account. You can reinstall it on your computer at any time. (However, please don’t do the uninstall/reinstall process over & over, because we have a limit on the number of times we can install the software with our license.)
Q: What if I had to uninstall and reinstall an Adobe product a few times, and now it says that I’m out of installations?
A: Contact the Help Desk at helpdesk@elcamino.edu
Here are some common problems you may encounter in your Adobe account. For a few of these, it’s best to email the Help Desk straight away. For the others, please try the listed solutions on your own before contacting the Help Desk.
Important: Our Adobe accounts are completely FREE for all El Camino employees (full-time, part-time, TNC, etc.) Our license level comes with 60+ different programs. So you should not have to pay for any Adobe products.
Please don’t enter a credit card number or sign up for a free trial.
Go right to the Help Desk
For these issues, please contact the Help Desk at helpdesk@elcamino.edu
- You can’t log in
- You get a message that your license has expired, even though you’re connected to the VPN
- It asks you to give a credit card # or start a ‘free trial’ the very first time you log in*
* If that happens when you’ve already been using your Adobe account, you might want
to try the uninstall/reinstall troubleshooting steps to see if that fixes it, before
contacting the Help Desk. (That’s probably the first thing they’ll have you try anyhow)
Other common issues
Please take a look at the relevant pages before contacting the Help Desk. Some of these can be solved by doing the uninstall/reinstall steps listed at the end of this guide.
For some of these, the solution is to write to the Help Desk, but this guide will help you know what to look out for, and also what info to include in your email to them. (Including this info in your email will help ITS fix the issue faster.)
- It looks like one or more Adobe programs is missing (such as Photoshop)
- You can see an app/program, but won’t let you click on it
- It says we have 68 apps, but when you go to access them you only have 21
- It says you have Acrobat DC instead of Acrobat DC Pro (or it goes back & forth)
- Certain features or buttons within the software are missing
- It mention pricing or ‘free trials’
- You tried the uninstall/reinstall steps, but it didn’t work
It might not actually be missing…
When you log into your Adobe account, you’ll probably see only 6 programs/apps listed. That can be a bit disconcerting when you know we actually have 60+ (especially if the one that you need isn’t listed.) There’s unfortunately no link saying “+ over 60 more…” – and at first glance this screen can make it look like a bunch of the programs are missing.

I think they do this so the page isn’t crowded.) → Click on the “View all apps and services” button and you’ll see a page with a bunch of apps & features.
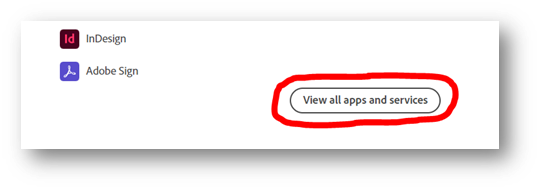
This page should show you all the apps/programs we have in our plan. As of the making of this guide, it should say that we have a total of 68 apps. (67 Creativity & Design apps + 1 PDF & E-Signature app.)
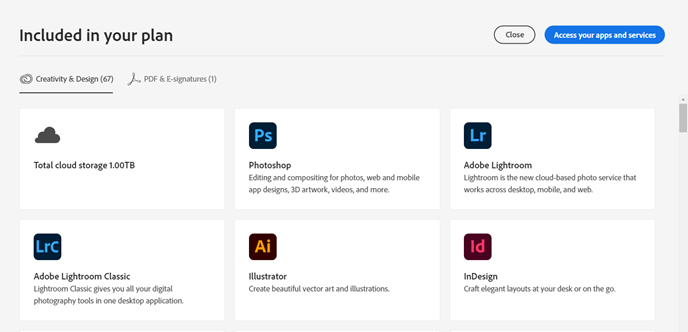
If it shows a smaller number than 68 total, here are the steps:
- Click on the blue “Access your apps and services” button in the upper right corner

- This next page shows the apps/programs that you have access to. Scroll through to see if the app(s) that you need (or ones that you think you might need in the future) appear in this list. These apps should all have an “Install” button underneath them.

- If you see the one(s) you want or that you think you’ll need, it isn’t necessary to contact ITS. For example, Dreamweaver is missing in my account, but that’s okay because I use the OU Campus CMS for our website, not Dreamweaver. (***If you think you might ever need to send a document out to get signed, check to see if Adobe Sign is one of the apps that you can install.)
If an app/program that you currently need or one that you might in the future isn’t there, go ahead and email helpdesk@elcamino.edu:
-
- Let them know that the app(s) you need aren’t appearing on the page that lists all the ones you can install. Please mention which ones you need that are missing.
You can see all our apps/programs, but you can’t click on them
For some reason, rather than taking you straight to clickable icons for our app/programs, the site sometimes takes you first to this ‘Showcase’ page, where it lists all the programs we have but none of them are actually clickable.

To get to the page where you can open up the programs, click on the blue “Access your apps and services” button in the upper right-hand corner.

Less than 68 Apps Available
Here is a screenshot of the page that lets you access your Adobe apps/programs. You should have 60+ different apps on this page in the “Available in your plan” area, with ‘Install’ buttons beneath them.
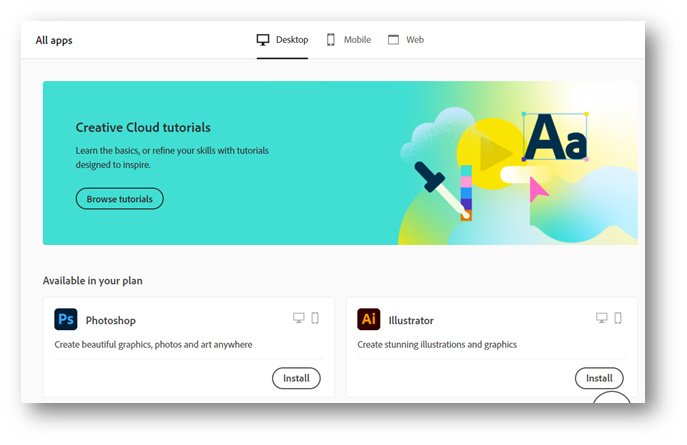
If you have…
- 21 apps – Email the Help Desk and let them know that on the page with the Install buttons,
you only have 21 apps in the “Available in your plan” area. Please mention that you
think it is the split license issue.* (You will likely need to bring your laptop in, or have an ITS tech come to your office.)
A different number of apps – Email the Help Desk and let them know that on the page with the Install buttons, you only have ___ [#] apps in the “Available in your plan” area.
*In case you’re curious, the split license issue has to do with the new type of license we got from Adobe. Employee computers are supposed to get a lot more apps/programs (68 total) than the campus computer lab computers (which get 21.) So if you have 21 in your account, it means Adobe is identifying your computer as being a lab computer instead of an employee computer. ITS will need to fix this.
You have Acrobat DC instead of Acrobat DC Pro
Our licensing package actually comes with both Acrobat DC Pro and Acrobat DC Standard.
-
- If it shows that you only have the regular kind of Acrobat DC (Acrobat DC Standard), please email the Help Desk. Be sure to mention that you think it’s possibly the split license issue.* (You will likely need to bring your laptop in, or have an ITS tech come to your office.)
*For more info on the split license issue, please see the previous section.
You can see all our apps/programs, but you can’t click on them
For some reason, rather than just taking you straight to clickable icons for our included programs, the site takes you to a kind of ‘Showcase’ page first, where it shows all the programs but none of them are clickable.
To get to the page where you can open up the programs, you then have to click on the blue “Access all apps and services” button in the upper right-hand corner.

Here’s what your ‘showcase’ page might look like:

What to look out for
Pricing / free trials
Again, please do not enter any credit card information.
Missing features
Here’s an example of a missing feature in a product. In this Adobe Acrobat DC menu, there should be a tool called ‘Send for Signature’ right beneath the tool for ‘Fill & Sign.’
One way to tell what a menu or field of buttons could look like is to find a quick YouTube tutorial about the product.
Note: Just because a feature is missing, though, that doesn’t necessarily mean it’s a glitch. ITS disables certain features and buttons within some software (for example, the create password feature on file sharing in OneDrive.)
If you aren’t sure if you’re supposed to have a specific feature/button/link, you can send a screenshot to the Help Desk at helpdesk@elcamino.edu. Please note in the email which one(s) are missing.
Missing products
There’s a known glitch where various Adobe products look like they aren’t included in El Camino’s license anymore, even though we still have them. It may even let you download them on one page in your account, while on a different page it asks you for a credit card number to use them.
Here are some screenshots from my account, where it encouraged me to sign up for a free trial of Acrobat Pro DC on one page, while telling me that my license included Acrobat Pro DC on a different page.
It’s totally fine if a product that you weren’t planning on using is missing. For example, we have OU Campus for our website CMS, so I won’t need to use Dreamweaver. If you’re curious, here is a list of products that come with our license:
|
|
|
|
|
|
|
|
|
|
Bridge |
|
|
|
|
|
|
|
|
|
|